Host-Based Development with Apache NuttX – CAN Network Simulation
Developing and testing embedded applications involving multiple devices running dedicated firmware is always a challenge—especially for networked system where many nodes must collaborate. This process can be simplified by shifting part of the development workflow to a simulated environment, where hardware-related issues can be ignored and the focus remains on application logic.
In this post, we'll demonstrate how to simplify the workflow for CAN network application development by simulating the entire network on a Linux host—no physical hardware required. We'll run several Apache NuttX images that communicate over a simulated CAN bus using the host's SocketCAN interface. This approach allows for faster development iteration, easier debugging, and a significantly smoother developer experience—especially useful when working with complex multi-node systems. Thanks to NuttX's portable interfaces, applications developed in a simulated environment can be easily ported to real hardware.
This post marks the beginning of a new series on this blog, focused on host-based development with NuttX. Throughout the series, we'll explore practical techniques for building, testing, and debugging embedded applications directly on your development machine.
Application
We base this demonstration on an application introduced in a previous post: small CAN node. The application implements the following fetures:
Sending periodic heartbeats.
Reading the state of a button and reporting changes over CAN bus.
Controlling the state of an LED over CAN bus.
Since we are not using real hardware with GPIO support, we need to introduce a
few minor changes to the code. The Simulator and QEMU don't implement the correct
USERLEDS and BUTTONS drivers, so we replace them with a simple software
implementation. The proper solution in this case would be to implement dedicated
simulated drivers on the kernel side, allowing the application to use the same
kernel interfaces as in the case of real hardware. However, for simplicity, we
take the easy way out and modify the application code directly.
The button handling code is modified to generate random button state changes and report them on the CAN bus. Our new button thread looks like this:
FAR void *thread_button(FAR void* data)
{
  FAR struct cannode_env_s *env = (FAR struct cannode_env_s *)data;
  struct canmsg_s           msg;
  btn_buttonset_t           sample;
  btn_buttonset_t           sample_last = 0;
  int                       ret;

  DEBUGASSERT(env);

  /* Seed the random number generator */

  srand(time(NULL));

  while (1)
    {
      /* Sleep some random time */

      sleep((rand() % 10)   1);

      /* Get button state */

      sample = rand() % 2;

      /* Next cycle if sample is the same */

      if (sample_last == sample)
        {
          continue;
        }

      sample_last = sample;

      /* Fill frame */

      button_msg(env, &msg, sample);

      /* Send frame */

      ret = can_send(env->fd, &msg);
      if (ret < 0)
        {
          PRINTF("can_send failed %d\n", ret);
        }
    }

  return NULL;
}
For the LED support, we use a simple console message when a request to change the LED state arrives on the CAN bus:
#ifdef CONFIG_USERLED
/* Set LED */

ret = led_set(fd, msg.data[0]);
if (ret < 0)
  {
    PRINTF("led_set failed %d\n", ret);
  }
#else
/* Just print message request */

printf("Set LED request %d\n", msg.data[0]);
#endif
Now it's time to discuss CAN network support in a simulated environment for Apache NuttX. NuttX currently offers two useful solutions for this:
A CAN bus card over PCI, which can be run in QEMU environment.
A simulator target with direct access to the host's SocketCAN interface.
Two PCI CAN cards compatible with QEMU [1] are currently supported in NuttX:
Kvaser PCI CAN-S, based on the SJA1000.
CTU CAN FD
The Kvaser card supports only CAN 2.0, while the CTU CAN FD card also supports CAN FD. For our demo, we chose the second option.
All the mentioned CAN solutions for the host are available in NuttX in two versions of CAN interfaces: as a character device or as a SocketCAN interface.
Configuration
Details of the CAN nodes used in our network are shown in the table below:
Target |
Target CAN interface |
CAN Node ID |
Heart beat |
EXTID |
|---|---|---|---|---|
Simulator |
Character device |
0x100 |
1 sec |
Yes |
Simulator |
SocketCAN |
0x200 |
1 sec |
No |
qemu-armv7a |
Character device |
0x300 |
1 sec |
No |
qemu-armv7a |
SocketCAN |
0x400 |
1 sec |
Yes |
Additionally, there are two actors in the network:
A QEMU x86-64 device running a NuttX image that supports the
candump, used to monitor traffic in the network.The host machine using the
cansendtool to send LED state change requests.
Now, let's move on to the system configuration, focusing only on the settings related to CAN bus support.
Simulator
Support for CAN network in the Simulator is enabled with CONFIG_SIM_CANDEV=y.
Next, we need to configure the CAN interface available for the application in NuttX:
-
CAN node with character device interface:
-
CAN node with SocketCAN interface:
Both interfaces can be enabled at the same time, but in our case, we don't use this feature.
For the CAN character device version, we additionally set CONFIG_CAN_EXTID=y
to enable CAN extended identifiers.
Complete configurations for the Simulator are available below:
QEMU armv7a
As QEMU target we use qemu-armv7a. To enable CTU CAN FD card support for
this board, we just need:
Further configuration depends on the interface used by the applicatio and it's almost identical to what is presented above:
-
CAN node with character device interface:
-
CAN node with SocketCAN interface:
For CAN PCI cards in NuttX, only one CAN interface can be supported at a time.
For the SocketCAN version we additionaly set CONFIG_NET_CAN_EXTID=y to
enable CAN extended identifiers.
Complete configurations for the qemu-armv7a can be found below:
QEMU intel64
This target is used to listen for CAN frames or to send requests to nodes,
simulating a master device on the network. To enable support for
the can-utils tools, use the following configuration options:
CONFIG_ALLOW_BSD_COMPONENTS=y
CONFIG_CANUTILS_CANDUMP=y
CONFIG_CANUTILS_CANSEND=y
CONFIG_CANUTILS_LIBCANUTILS=y
The CTU CAN FD card configuration with the SocketCAN interface required by these
tools is the same as the one shown above, except that this time we don't need
CONFIG_DEVICE_TREE=y.
A ready-to-use configuration for the qemu-intel64 can be found at:
Running on host
Before running the demo, the first essential step is to compile all the images mentioned in the Configuration section. Copy-and-paste build commands are available in the code repository.
The steps to run the demo are outlined below:
-
Prepare a virtual CAN interface.
Both the Simulator and QEMU require the CAN network to be available on the host at the time of launch. To set this up, create a virtual CAN interface (
can0) using: -
Run NuttX on QEMU
x86_64.To start QEMU with CTU CAN FD support we need this argument:
Additionally, we have to connect the SocketCAN host interface to our PCI device:
The command to run the NuttX image with QEMU on x86_64 is:
qemu-system-x86_64 -m 2G -cpu host -enable-kvm \
-kernel nuttx -nographic -serial mon:stdio \
-object can-bus,id=canbus0-bus \
-object can-host-socketcan,if=can0,canbus=canbus0-bus,id=canbus0-socketcan \
-device ctucan_pci,canbus0=canbus0-bus,canbus1=canbus0-bus
Next, bring up the network and start
candump: -
Run NuttX on QEMU
armv7a.For the ARM image, we use the same CAN card configuration.
The command to run the NuttX image with QEMU on ARM is:
qemu-system-arm -cpu cortex-a7 -nographic \
-machine virt,highmem=off,virtualization=off,gic-version=2 \
-chardev stdio,id=con,mux=on -serial chardev:con \
-mon chardev=con,mode=readline \
-kernel nuttx -object can-bus,id=canbus0-bus \
-object can-host-socketcan,if=can0,canbus=canbus0-bus,id=canbus0-socketcan \
-device ctucan_pci,canbus0=canbus0-bus,canbus1=canbus0-bus
-
Run NuttX in the Simulator.
To run NuttX in the Simulator, simply execute the generated ELF file:
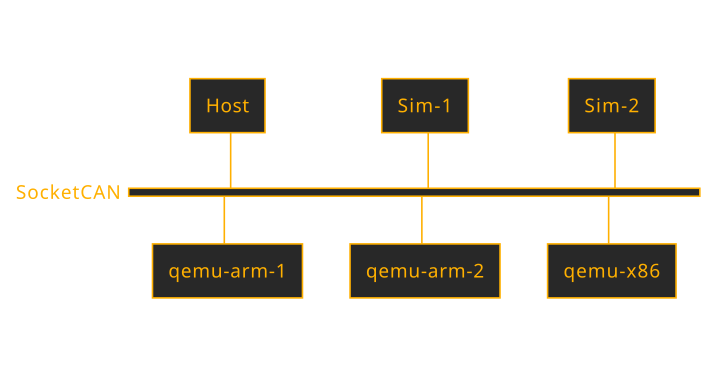
The video below presents a complete demonstration of the CAN network setup
described above. On the left side of the screen, qemu-intel64 is running
NuttX with candump, actively capturing and displaying CAN frames.
On the right, four CAN nodes are running simultaneously, communicating over
the same virtual network. In the bottom-right window, the host console is
used to send commands to the nodes with the cansend utility, allowing
interaction with the simulated CAN setup on the fly.
Summary
This post explored how CAN network development can be moved partly into a simulated Linux environment, making both development and debugging significantly easier compared to working with physical hardware. Of course, testing on real hardware remains essential when working with embedded systems and cannot be omitted, but simulations save a lot of time and make life easier.
Although the example presented uses a relatively simple CAN setup, the same approach can scale to much more complex systems or be adapted for minimal configurations involving only a single CAN node. Working with multiple NuttX images in parallel becomes especially easy with CMake's support for out-of-tree builds, something that would be far less efficient using the traditional Make build system available in NuttX.
While the demo uses the NuttX Simulator and QEMU, other tools like Renode with the host's SocketCAN interface [2] are worth exploring. Moreover, the network isn't limited to NuttX nodes; any system or tool that can interface with SocketCAN—such as Linux images or even host-side programs—can participate in the simulation.
Beyond development, this simulated setup provides an excellent foundation for
automated testing using tools like python-can [3] or Vector SIL Kit [4].
There's even the possibility of combining virtual and physical environments
using tools like cangw [5], which allows forwarding traffic between
simulated nodes and real CAN hardware.
The main limitation of this workflow lies in the relatively limited peripheral support in QEMU and the NuttX simulator. Expanding device support and enhancing NuttX's infrastructure for host-side driver development would make this approach even more powerful.
In future posts, we'll look at more advanced scenarios, including running CANopen-based applications with the Lely CANopen stack [6] supported in NuttX.
References
Comments